4.2. Blending, Aliasing, and Fog
4.2.1. Blending
When blending is enabled, the colour of surfaces can be combined, if the surface in front is not completely opaque.
This can be calculated using the alpha value of the colour. Instead of RGB, we can use RGBA, where the A is the opacity of the colour, ranging from 0 (transparent) to 1 (opaque).
We need to enable it in OpenGL:
glBlendFunc(GL_SRC_ALPHA, GL_ONE_MINUS_SRC_ALPHA);
glEnable(GL_BLEND);
Remember the result also depends on which object is in front and which one is behind.
It usually is best to draw objects far away first, as that will result in more realism.
4.2.2. Fog
Normally, objects far away would not be as sharp and clear as objects close by. We can simulate this with “fog”.
Fog is just an adjustement of the colour of a pixel based on the distance from the camera.
It can also give an impression of depth.
It can be generally implemented as follows:
- Define the clear colour to be your fog colour
- Pass a distance value to the fragment shader in some way
- Define fog parameters
- Min distance
- Max distance
- Fog colour – make the same as the clear colour
- Fog relationship, e.g. linear or exponential
- Calculate fog factor from depth distance (in eye coordinates)
- Ensure the fog factor is in the range 0 (no fog) to 1 (max fog)
clamp()function is useful
- Mix the lit, shaded colour with the fog colour
mix()function is useful
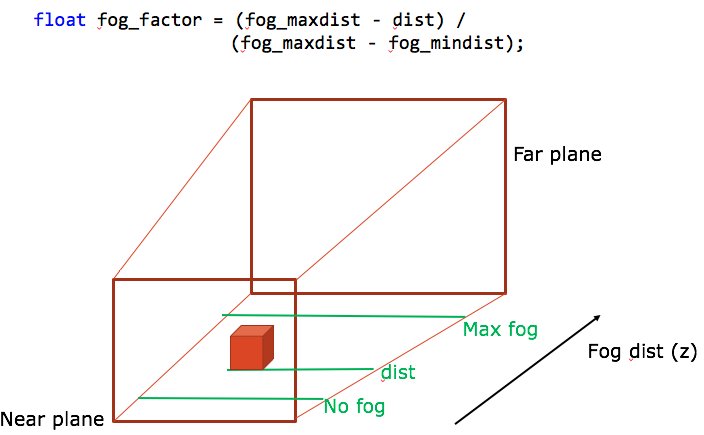
In the fragment shader, we could have code like follows:
// Fog parameters, could make them uniforms and pass them into the fragment shader
float fog_maxdist = 8.0;
float fog_mindist = 0.1;
vec4  fog_colour = vec4(0.4, 0.4, 0.4, 1.0);

// Calculate fog
float dist = length(fposition.xyz);
float fog_factor = (fog_maxdist - dist) /
                  (fog_maxdist - fog_mindist);
fog_factor = clamp(fog_factor, 0.0, 1.0);

outputColor = mix(fog_colour, shadedColor, fog_factor);
The fog blending factor is usually a simple equation, which could be one of the following, where \(d\) is the density of the fog.
Below, fog density increases rapidly with distance:
Below, fog is less dense at short range, but increases even more rapidly with distance:
Below, fog greater at short distance and increases slower and linearly:
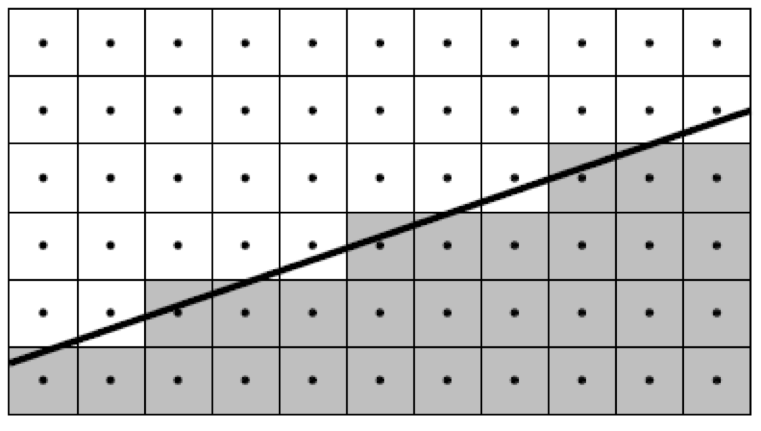
4.2.3. Aliasing
General term for artefacts in computer graphics images, caused by problems with regular sampling of the image model.
Antialiasing are measures to counteract that.
Here’s what aliasing looks like:
4.2.3.1. Antialiasing
Drawing lines: colour the pixel if its centre lies on the line.
The obvious problem with this is that if the line isn’t exactly over the center of a pixel, we don’t draw the pixel at all.
So what to do is calculate how much of the line is over a pixel, and then colour the pixel in an amount equivalent to the percentage covered multiplied by the colour. This is done by blending, actually.
The coverage value (from 0.0 to 1.0) is multiplied by the alpha value of the colour, and then the pixel is coloured with that alpha value.
When the line is not lying fully over the pixel, the pixel becomes slightly more transparent.
4.2.3.1.1. Lines
For lines, it is easy enough in OpenGL. We just have to pass a hint to the OpenGL pipeline to do anti-aliasing of lines:
glEnable(GL_LINE_SMOOTH);
glEnable(GL_BLEND);
glBlendFunc(GL_SRC_ALPHA, GL_ONE_MINUS_SRC_ALPHA);
glHint(GL_LINE_SMOOTH_HINT, GL_NICEST);
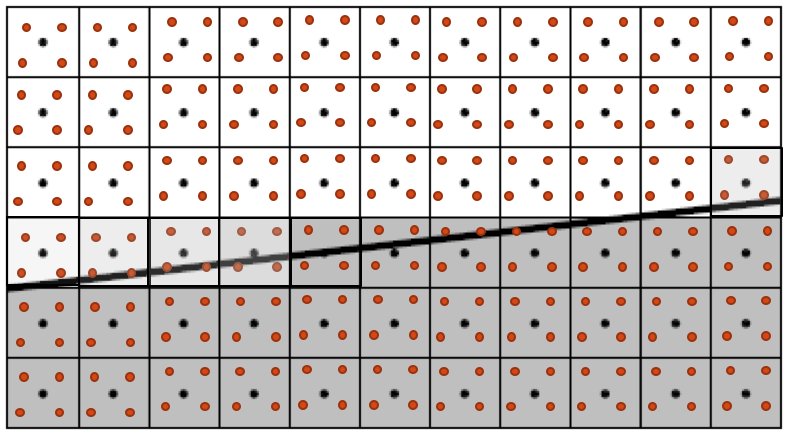
4.2.3.1.2. Super-Sampling
Involves generating a virtual image at a higher resolution (e.g. 3x or 5x the resolution). Then we can calculate the colour of pixels in the original image as the average between the pixels that would correspond to that position in the extra-resolution image.
It entails a performance hit, so it is no longer very popular.
4.2.3.1.3. Multi-Sampling
Multi-sampling is a good general solution to aliasing, but it comes with some caveats:
- Performance hit;
- Disables line smoothing;
- Not available under all circumstances; and
- Effect will vary with the implementation.
Just sample each pixel multiple times at different positions, and calculate the colour based on that:
Simply send the GLFW_SAMPLES window hint when creating the window:
glfw.init()

glfw.window_hint(glfw.SAMPLES, 4)
Then, enable GL_MULTISAMPLING:
glEnable(GL_MULTISAMPLING)